Get Approval Workflow Block
Add approval stages to the workflow process. You can specify approvers, approval criteria, and timelines for approvals.

|
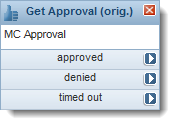
Significant changes to this feature include the ability to cancel an approved workflow and to prevent self-approval. Only new Get Approval blocks contain these options. Previous Get Approval blocks (identified in the block title) function as they always have. To use the new functions, you must manually replace the old blocks with the new ones (drag and drop). |
|
|
|
Exit Ports
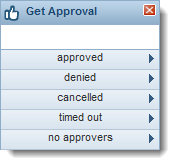
Exit ports for this block allow workflow paths for approvals, denied approvals and items that are timed out.
- Define additional exit ports under the Exits Configuration tab.
An additional exit called canceled appears in new Get Approval blocks since the HEAT 2013.2 release. Customers using Get Approval blocks from earlier releases do not have to change anything. The cancelled exit is used by the workflow engine if:
- The approval object status is changed to canceled.
- The statuses of the approval vote tracking objects are set to canceled. The workflow engine also sets the approval object status to canceled.
| approved | The request is approved and the workflow continues to the next step. |
| denied | The request is denied and the workflow is terminated. |
| canceled | The request is canceled and the workflow is terminated. |
| timed out |
The workflow is terminated as incomplete because an event exceeded the defined length of time. |
| no approvers | The request did not receive the minimum number of approvers and the workflow is processed according to the settings in the Properties window. |
| Property | Description |
|---|---|
| Title | Enter a unique name for the object. |
| Approval Title | If needed, enter the name of a related formal approval. You can use an expression in this field. This title is sent during Approval Notification Emails. |
| Users from Group | Select to designate an approver group from the drop-down list, such as a Change Advisory Board (CAB). Approvals can be accepted from any member of this group. These groups are defined within the Contact Group business object. |
| Users from Contact Group in Context BO Field |
Select to designate an approver CONTACT GROUP defined in the context of a business object field from the drop-down list. For example, on an RFC, rather than the workflow dictating which Change Advisory Board is used, the system can provide the requester with the option to specify in a drop-down list which CAB will be approving. When designing the Get Approval block, make sure that the pick list that you select as a value for the user or contact group (who gets the approval notification) has a stored value that is a unique identifier for the user or contact group. |
| Users from related Employees |
Select when approval is sought from a group of employees linked to the object needing approval. For example, when a service request is created, the line manager of the requester could be linked to the request. That line manager employee would be used. You can designate any of the employees associated to the current business object, by means of the relationship between the current object and the employee.profile. Then select an employee name. This criteria section is intended for use by approver groups. Another good example is where many different groups of people are approvers, but dependent on certain fields or parameters in the object. Rather than defining many static approval groups (contact groups) and having a very complex workflow to decide which approval group is the correct one, this option can be used to create the approval against a list of employees that has been dynamically linked to the object. For instance, suppose the organization had a change control process that had a different group of approvers for each service being impacted by a change. It would be a huge task to build and maintain a static contact group for each service. So instead, a relationship can be built on the service object allowing the service owner to define and maintain the list of service approvers for each service. The workflow on the RFC would then be modified to loop through each service linked to the RFC, and link each service approver employee record to the RFC. It could then, using this option, create a single approval, containing votes to each employee from the service approver list for every service linked to the change. |
| User | Select to specify a user for this approval, then choose a department and individual user from the drop-down list. |
| User from Context BO field/Service Request Parameter |
Select when a SINGLE person is required to approve and the reference to that person is in a field on the object needing approval. For example, in some cases, organizations allow people logging a request in the Service Catalog to choose the approver from a drop-down list. In that case, the approval vote is sent only to that one individual. For example, any valid supervisor associated with this workflow can be invoked as an approver by using $([Profile#Employee.]Supervisor_Valid). Another example involves requiring approvals from the owner of a related configuration item within the service request business object. In this case, enter $(DefaultApprover) in this field, and this value serves as the sole approver for the record. |
| Requester cannot be sole approver | Check this value to prevent the requester from being the only approver for the request, then select the field defining the requester (such as created by). |
| If no approvers found |
Select the action to perform if no approvers are found. There could be times when the logic results in no approvers being specified. For example, a service owner has not linked any service approvers to a service. In that case, if an RFC was logged against that service, no approvers would be present, so the system needs to know what to do.
|
| Approval Voting Deadline |
Select the deadline option:
|
| Group Approval/Denial Criteria |
This criteria section is intended for use by approver groups. Select an option:
|
| Notifications |
Choose the notification template for each from their drop-down lists. This list is dynamic according to your implementation. See Communication Manager. The default notifications are:
|
You can designate timeout according to your hours of operation. For example, if you are closed on weekends, but you have designated an approval time of two days. If an object is approved late on a Friday, it would time out sometime on Sunday - before anyone would have a chance to approve. Apply the hours of operation to extend the approval to working hours. In this example, the object would time out sometime on Tuesday.
First, designate the hours of operation for your organization. See Setting Up Hours of Operation.
Place the block on the workflow designer, then select the hours that you want to apply. You can modify an existing workflow.
The following procedure enables you to:
- Designate a specific hours of operation when the duration option for the approval timeout is selected.
- Specify the approval timeout using a duration that uses hours of operation and the creation time of the approval vote
- Specify an hours of operation using a context business object field.
- Specify a hours of operation from a drop-down list.
Before Designating Hours of Operation in the Get Approval Block
Before you select the hours of operation in the Get Approval block, you must do the following:
- Optional. Create a field to contain the hours of operation, if you decide to use the hours of operation field. See Using Fields.
- Optional. Designate the hours of operation for your organization. See Setting Up Hours of Operation. Or you can use the default hours included in the application.
- Add the field to a form.
The following example shows an hours of operation field added to the Change Details form:
Change Details Form with Hours of Operation Field
When you access this form, you can choose the hours of operation from the drop-down list.
Designate Hours of Operation in the Get Approval Block
| 1. | Within your workflow, (for example, the Change Approval workflow) double-click to open the Get Approval block. The system displays the block properties. |
| 2. | Within the Approval Voting Deadline section, set the duration of the approval process. For example, you could set a duration of 2 days, 0 hours, and 0 minutes. |
| 3. | In the Hours of Operation section, select the Hours of Operation field, then choose the field you want from the drop-down list. The approval process only includes those hours designated in the selected schedule. |
- The Hours of Operation field enables you to use an hours of operation field that you created and for users to designate the hours to use for each record.
- If you select the Name field, the system globally applies the option to all records within the business object.
| 4. | Click Save in the properties box.
Click Save  from the toolbar. from the toolbar.
|
Sometimes the Get Approval block does not appear to validate. In these cases, use this procedure to fix the behavior:
| 1. | Within the workflow designer, double-click the Get Approval block. The system displays the block properties page. |
| 2. | Click Save at the bottom of the page. Although it might have been previously saved, this workaround remedies the validation situation. |
| 3. | Click Save or Validate. The Get Approval block is now validated. |


